What You Will Learn From This Godot Grid Movement Tutorial
How to create player sprite that move in 2D grid
Create Collision walls where the player sprite cannot pass through the wall
Part 2 – Player Sprite Moves within Walls
Create Walls
i. Add child node -> Add TileMap.
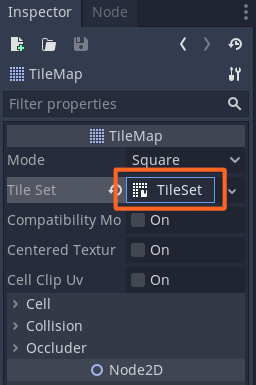
ii. Set Tile Set from empty to new Tile Set.
iii. Double click on new Tile Set to change to Resource tab.
iv. Click “+” add texture (add bottom left)
v. Use the default Godot icon as the wall.
vi. Make the Icon editor window bigger by clicking on the up arrow (bottom right)
vii. Zoom in the tile set by clicking “+” at top right.
viii. Click “New Single Tile” and click grid icon to enable the grid.
ix. Select the icon if selected yellow line will appear.
x. Change color to black by clicking the “Modulate”
xi. Change RGB color to 000000
godot grid movement – create tilemapgodot grid movement – set tile set to new tile setgodot grid movement – double click on new tile set to set the resourcesgodot grid movement – add the resourcegodot grid movement – use default godot icongodot grid movement – click up arrow bottom rigth to make the icon editor biggergodot grid movement – zoom in the icongodot grid movement – click new single tile and enable the gridgodot grid movement – grid enabledgodot grid movement – change color by clicking on modulategodot grid movement – change color to black where RGB 000000
Add Collision to The Wall Tile Set
i. Ensure tile set is still selected (yellow outline)
ii.Click “Collision”
iii. Click the square icon
iv. The select the region within the yellow line.
v. Icon color will change to turquoise if collision is properly set.
godot grid movement – add collision square
Create The Maze
i. Click on player sprite (to go back to player scene)
ii. You will see the TileMap is black now.
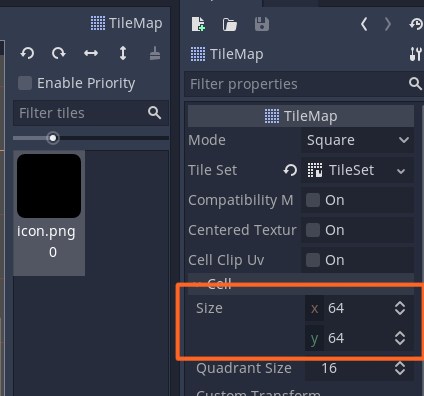
iii. Check the TileMap is 64×64
iv. Click on TileMap and start populating the walls to create your own maze.
godot grid movement – wall is blackgodot grid movement – ensure size is 64×64godot grid movement – create maze
Add RayCast2D to Player Sprite
i. Right click on Player sprite -> Add child node
ii. Select RayCast2D
iii. Set the RayCast2D
– Position x = 32, y = 32 (to make centre (red plus sign))
– Enable is on
– Cast to y = 32 (to make the down blue arrow to just at the edge of the player sprite)
godot grid movement – create raycast2Dgodot grid movement – set the raycast2D
Update the Player Script
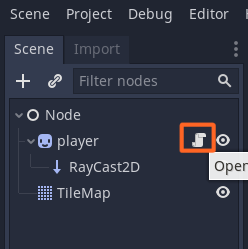
i. Click on the script icon near Player sprite
ii. Update the script based on the code below.
iii. Ensure script indentation is correct.
What You Will Learn From This Godot Grid Movement Tutorial
How to create player sprite that move in 2D grid
Create Collision walls where the player sprite cannot pass through the wall
Part 1 – Make the Sprite Move
Create Node
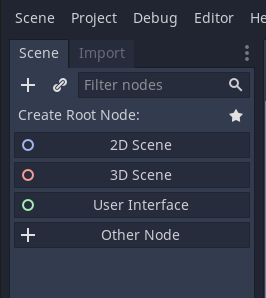
i. Click “Other Node”
ii. Then select “Node”
godot grid movement – create nodegodot grid movement – select node
Create Sprite
i. Right click “Node” -> Add child node
ii. Select Sprite
iii. Drag and drop icon.png into sprite texture at right panel
iv. At sprite panel, untick centered on
v. Click “Scene” (top menu left) then save scene as player.
godot grid movement – create spritegodot gride movement – drag n drop icon to sprite texturegodot grid movement – untick centeredgodot grid movement – save scene as player
Add Script to the Player sprite
i. Right click on Sprite -> Attach Script
ii. Click create on when the window open.
iii. Remove all codes except “extends Sprite”
iv. Copy the code below and paste to the script. Ensure indentation is correct.
godot grid movement – attach scriptgodot grid movement – create script
godot grid movement – remove all codes except extends Sprite
I use knex to update and returning number of rows been updated. It seems that knex returning update return unknown[]. But when I do checking using typeof it is actually number.
But apparently Typescript not allowed me to simply convert it.
So below is the solution.
1
2
3
4
5
//change the unknown[] to number[]
constresult=await query.run()asnumber[];
//check if result is array, and do proper conversion
I created the Programmers Quadrant to make my software developers team aware of their current skills position.
With the quadrant, a programmer can easily visualize where are they now in term of skills.
The quadrant has Data Structure and Algorithm as its vertical axis. While Reusable Codes as it horizontal axis.
This programmers quadrant is only for someone who knows to code already. If he is still learning, he won’t be categorized under this quadrant.
Data Structure and Algorithm Vertical Axis
This axis represents how good a programmer regarding data structure or algorithm.
The better he is the higher he can go into the axis.
Given a set of requirements, a programmer must be able to identify the best data structure and algorithm to solve the requirements.
Reusable Codes Horizontal Axis
This axis how good a programmer in making a reusable codes instead of hard coded to a specific application.
A person who has good knowledge on object oriented programming, design pattern, best coding practice and follows naming convention standard.
4 Programmers Quadrants
#1 – Einstein Coder
A programmer who is very good in data structure and algorithm but at same time can produce reusable codes.
#2 – Genius Code
A programmer who can create or know what is the best data structure or algorithm to be used but his code is hard coded.
#3 – Engineer Coder
A programmer who most of the time uses third party library or technology to make its application and the code produced is reusable and easily readable.
#4 – Frankenstein Coder
A programmer who use third party library, can make an application works but he produces hard coded application and not reusable for other application and not easily readable.
The following timeouts are supported (all timeouts are specified in milliseconds):
implicit specifies the maximum amount of time to wait for an element locator to succeed when locating elements on the page. Defaults to 0 milliseconds.
pageLoad specifies the maximum amount of time to wait for a page to finishing loading. Defaults to 300000 milliseconds.
script specifies the maximum amount of time to wait for an evaluated script to run. If set to null, the script timeout will be indefinite. Defaults to 30000 milliseconds.
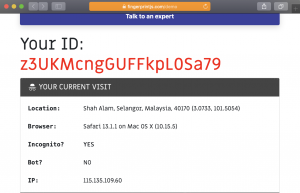
I noticed lots of websites now implement anti robot from website scraping. Most of them using fingerprintjs.com technology where it uses browser users agent as part to detect whether it is a robot or human.
I use Selenium Webdriver to scrap few websites. When I browse the website, it shows the content but if using Selenium it shows empty content.
You can test the fingerprintjs here to check whether it detects human or robot.
If using Selenium for Chrome and Firefox , fingerprintjs will detect it as robots. However if using Selenium Safari, it detects Selenium as human.
fingerprint detect selenium for safari as human
Safari when launch by default is in incognito mode so maybe harder for fingerprintjs.com detect it.
Below are comparison between Selenium for Chrome, Firefox and Safari browsers user agent.
Legend:
Yellow colored rows means there are differences between Selenium and normal browsers user agent.
Chrome Browser
No
Chrome - Normal Browser User Agent
Chrome - Selenium User Agent
1
Host: localhost
Host: localhost
2
Connection: keep-alive
Connection: keep-alive
3
Cache-Control: max-age=0
4
Upgrade-Insecure-Requests: 1
Upgrade-Insecure-Requests: 1
5
User-Agent: Mozilla/5.0 (Macintosh; Intel Mac OS X 10_15_5) AppleWebKit/537.36 (KHTML, like Gecko) Chrome/84.0.4147.105 Safari/537.36
User-Agent: Mozilla/5.0 (Macintosh; Intel Mac OS X 10_15_5) AppleWebKit/537.36 (KHTML, like Gecko) Chrome/84.0.4147.135 Safari/537.36
Previously I use Babel Javascript to convert my javascript to ECMA2015. I like to program in object oriented because I learned my first programming language in C/C++ and Java.
Doing procedural language like C was much easier vs object oriented Java. But in the long run, I noticed that coding in object oriented is much easier to maintain.
Steps to Convert Javascript to TypeScript
Install TypeScript
1
npm install-gtypescript
-g to make it global so all your JavaScript programs can be migrated to TypeScript.
Create tsconfig.build.json, tsconfig.json and tslint.json
At your root project folder run the below command.
1
tsc--init
I edited my tsconfig.json as follows:
1
2
3
4
5
6
7
8
9
10
11
12
13
14
15
16
17
18
19
20
21
{
"compilerOptions":{
"target":"es2017",
"module":"commonjs",
"lib":["dom","dom.iterable","esnext"],
"rootDir":".",
"moduleResolution":"node",
"resolveJsonModule":true,
"removeComments":true,
"emitDecoratorMetadata":true,
"experimentalDecorators":true,
"allowSyntheticDefaultImports":true,
"types":["node","mocha","chai"],
"typeRoots":["node_modules/@types","src/types"],
"jsx":"react"
},
"exclude":["node_modules","dist","src/admin"],
"include":["src/**/*.ts","src/**/*.json"]
}
I added manually tsconfig.build.json and tslint.json
Change Your Existing Files Extension from .js to .ts
typescript change all js to ts extensiontypescript change all js to ts extension
Amend Coding T0 Follows TypeScript
Below are few examples TypeScript coding standard that you must follow.
1
2
3
4
5
6
7
8
9
10
11
12
13
14
15
16
17
18
19
20
21
22
23
24
25
26
27
28
29
30
31
32
33
34
35
36
37
38
#1 - require to import
constHumanoid=require("./humanoid/index.js");
//change require to import & remove file extension
import{Humanoid}from"./humanoid/index";
#2 - add export in front of class and remove module.exports
export classHumanoid extendsHumanoidReqHandler
//remove all line that have module.exports
module.exports=Humanoid;//delete this line
#3 - declare all global variables inside a class as class variables
this.taskName="something";
//then can call this.taskName inside your class after declare the variable name
protectedtaskName:string;
//#4 - declare abstract method by adding keyword abstract
//example of javascript - abstract method
if(this._execute===undefined){
thrownewError("Abstract method _execute()");
}
//put abstract in front of class keyword
abstractclassTask{
constructor(){}
abstract_execute():any;
}
//#5 - use import * as something from 'somewhere'
//if error class name .default is not a function decla
//example
importmfrom'moment';
TypeError:moment_1.defaultisnotafunction
//change to
import *asmfrom'moment';
If you Find below error, add return true at main async function.
typescript error promise contructor
1
2
3
4
5
(async function(){
console.log('start program');
console.log('end program');
returntrue;//add return true to solve error
}());
Besides, you can use TypeScript linter @ tslint (that was set up early) to fix any coding that doesn’t follow TypeScript standard. TypeScript standard is more strict vs JavaScript.
Example of tslint verbose message:
typescript tslint
Run Unit Test
I use mocha to do unit test.
1
npm install--save-dev@types/mocha
At package.json, add new script command
1
2
3
4
"scripts":{
...//other commands
"test-filename":"mocha -r ts-node/register"
},
Example if you want to run one individual unit test.
1
npm run test-filename./---g"./src/lib/utils/date-timestamp.test.ts"
If you found Error Cannot find module ‘ts-node/register’
Solution: save ts-node locally as develepment dependency.
1
npm install ts-node--save-dev
Run TypeScript Application
At the terminal or console, type
1
2
3
4
ts-node path-to-your-main-file
//example
ts-node./src/main.ts
Conclusion
Even though it takes time to convert from babel javascript into typescript but in the long run it is easier to understand the code and easier to maintain the code.
Besides, you just need to install ts-node and its linter is very good in displaying possible errors.
Benefits of using TypeScript
Easy debugging – Typescript shows directly line that throws an error
Strong type – any mismatch of variable will be highlighted by ts-lint
Less transpilation time – no need to compile like babel. If you have lots of .js files, it takes time to transpile it
Support better object oriented – it supports abstract, protected, private methods and variables.