Suddenly this morning around 11AM, 16th August 2021, my awesomegrasp.com is not reachable with error message of error establishing a database connection.
wordpress error establishing a database connection
From cPanel, I check my database is still up and running.
Database username and password is correct.
My other website is still running (means my hosting is up and running as it i shared hosting).
Error Explanation at wp-admin
I go to wp-admin and the page said one of the tables is broken and to fix it I need to enable below code at wp-configs.php:
1
define('WP_ALLOW_REPAIR',true);
wordpress error establishing a database connection – wp allow repair
Run Repair Tables
After enabled WP_ALLOW_REPAIR, I run repair tables.
wordpress error establishing a database connection – repair database
WordPress List Down The Repair Status
wordpress error establishing a database connection – database repair results
Remove WP_ALLOW_REPAIR
After remove WP_ALLOW_REPAIR, my website is up again.
My worry whether this is possible hacks in my wordpress installation.
I want to have unique array of objects. So if I add an object, any objects which have same values won’t be added twice.
So I try use Set() data structure.
Adding Object directly to Set()
1
2
3
4
5
6
7
8
9
10
11
12
13
14
constd1={ID:1,distance:2}
constd2={ID:1,distance:3}
constd3={ID:1,distance:2}
constset1=newSet()
set1.add(d1)
set1.add(d2)
set1.add(d3)
console.log("size set1: ",set1.size)
for(constitem of set1.values()){
console.log("item ",item)
}
Output
1
2
3
4
5
6
7
8
9
10
11
12
[LOG]:"size set1: ",3
[LOG]:"item ",{
"ID":1,
"distance":2
}
[LOG]:"item ",{
"ID":1,
"distance":3
}
[LOG]:"item ",{
"ID":1,
"distance":2
Conclusion:
As you can see, the Set result is 3. It should be 2. So it doesn’t work
Adding a stringify Object to Set()
1
2
3
4
5
6
7
8
9
10
11
12
13
14
15
constd1={ID:1,distance:2}
constd2={ID:1,distance:3}
constd3={ID:1,distance:2}
constset2=newSet()
set2.add(JSON.stringify(d1))
set2.add(JSON.stringify(d2))
set2.add(JSON.stringify(d3))
console.log("size set 2: ",set2.size)
for(constitem of set2.values()){
console.log("item ",item)
}
Output:
1
2
3
[LOG]:"size set 2: ",2
[LOG]:"item ","{"ID":1,"distance":2}"
[LOG]:"item ","{"ID":1,"distance":3}"
Conclusion:
The Set size is 2 with no duplicate values.
Overall Conclusion
So you can use Set but first stringifiy the objects than convert back the string to object by using JSON.parse() function
I want to do a multiplayer games but it is hard to really understand how it works.
I did refer the official tutorial from Godot here. but I still can’t understand it then I read the code example of multiplayer bomber.
From the multi player bomber, I just extracted when a lobby is created by Host and then a Player joins the lobby.
I did this to simplify the GDScript so I can focus on understanding its inner working.
Besides I add additional print() to see which function is called first and understand their sequence. To know the sequence I added timestamp when the function is called.
Example:
1
print("game state - register player() ",id," time stamp: ",OS.get_system_time_msecs())
I also rearrange the scripts into different folder to reflect its purposes and change gamestate.gd to GameState.gd
Print at Critical Functions To Detect Functions Calling Sequence
scripts/global/GameState.gd
print(“game state – connected_ok()”, ” time stamp: “, OS.get_system_time_msecs())
print(“game state – player connected(). ID: “, id, ” time stamp: “, OS.get_system_time_msecs())
print(“game state – register player() “, id, ” time stamp: “, OS.get_system_time_msecs())
scripts/lobby/lobby.gd
print(“game state – register player() “, id, ” time stamp: “, OS.get_system_time_msecs())
I want to do a simple board game. Lots of things, I don’t really understand, example the input events. I read the Godot documentation on Input Event but they didn’t provide any project example besides the code.
For beginner, it is not straight forward. So I share the project Input Event example based on the Godot documentation example.
Steps To Do
1. Create Godot Project
2. Create New Input Map
– Click Project -> Project Settings
godot project settings
– Choose Input Map tab
godot – input map
– Find ui_right and choose the right key on your keyboard
– Then click OK
– Do the same with ui_left
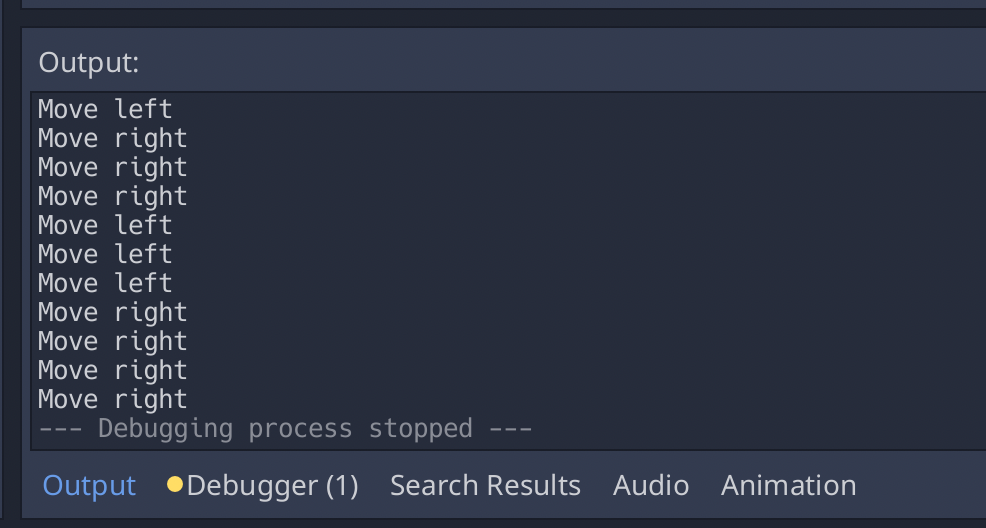
3. Test it, by pressing the keys on your game.
– The text will appear on the output screen
godot – output screen
Add Custom Input Map – Mouse Left Button Click
1. Go to project -> Project Settings
2. Type ui_mouse_left_button_click (you can give any name)
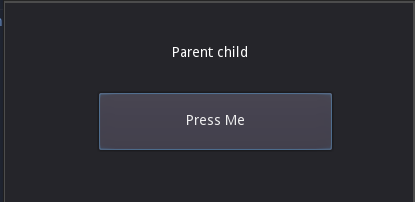
Lets say you want to have two GDscripts where the ChildScript.gd will call ParentScript.gd.
From there, you want the ChildScript.gd to call its parent function.
Create Class Inheritance
You first create inheritance in GDScript by calling “extends”.
1
2
3
4
extends"res://gdscript-filename.gd"
#example
extends"res://Parent.gd"
Call Parent Function . Use dot “.” to call parent function
1
2
#function example, where child calls parent function
.getText()
Download Godot Project Example
In this example, when “Press Me” button is clicked. The label will change to “Parent Child” where “Parent” is return value from parent function while child is from child function.
I’m still new to games development using Godot engine.
I follow the button signal tutorial on Godot website. I created the project for easy reference for others because at the website they don’t provide the Godot project that you can immediately play.
Full GDScript from the tutorial
1
2
3
4
5
6
7
8
9
10
11
12
13
14
15
16
17
18
19
# Declare member variables here. Examples:
# var a = 2
# var b = "text"
# Called when the node enters the scene tree for the first time.
Another problem I always face after upgrading MacOS where PHP is not running anymore. I have to google to find solution. Now I decided to write step by step tutorial so easy for my future reference and hopefully can help others who face the same thing.
1) My phpMyAdmin instead of showing login page, it displays its PHP code.
Macos Bigsur upgrade php not running
2) Uncomment PHP Module
Open httpd.conf
1
nano/etc/httpd.conf
Find php by typing
1
ctrl+wandtype php
Remove # to uncomment the PHP module.
remove # from load module php
Save the changes by typing
1
ctrl+xthentypeY
3) Restart Apache
1
sudo apachectl restart
4) Refresh the PHP page
macos big sur php running again after change httpd conf