How To Install PHP MySQL & Apache on MacOS Ventura on MacBook Pro M1

In my previous post, I was unable to install PHP & MySQL. This time after 2 years, I tried again but still fail, so I decided to use XAMPP to install PHP & MySQL and Apache on MacOS Ventura and it works!

But I had to disable default installed apache2 and change MySQL default port at XAMPP before MySQL and Apache2 can run on XAMPP.

How To Install PHP, MySQL & Apache using XAMPP

1. Download and install XAMPP

Mount the xampp dmg and run it. If you face unknown publish then do Control + Click on the XAMPP installer then run it again.

2. Follow the step by step instruction in installing XAMPP

Just follow the instructions.

3. Run the servers

If you unable to run the MySQL & Apache web server than follow below solution.

xampp macos ventura - mysql and apache webserver unable to start
xampp macos ventura – mysql and apache webserver unable to start

If you can run MySQL change it default ports. I use 3316 instead of default 3306.

xampp macos ventura - change the default port to 3316
xampp macos ventura – change the default port to 3316

I tried to stop mysql service but MacOS informed no MySQL service was running. Only by changing MySQL default port it works.

xampp macos ventura - mysql not running
xampp macos ventura – mysql not running

If you can’t run the apache2 server, stop default apache2 server by typing at the terminal.

Then run again Apache Web Server at XAMPP.

xamp macos ventura - apache webserver now running
xamp macos ventura – apache webserver now running

4. Test PHP & MySQL by accessing PhpMyAdmin

If you can access phpMyAdmin and create table or user from phpMyAdmin then your XAMPP installation works!

xampp macos ventura - access localhost and click phpmyadmin
xampp macos ventura – access localhost and click phpmyadmin
xamp macos ventura - successful installed php and mysql now can access phpmyadmin
xamp macos ventura – successful installed php and mysql now can access phpmyadmin

Ubuntu 22 Unable to Install Python3 pip3 due to dpkg: error processing archive

I tried to install pip3 on my Ubuntu version 22 but it produced error dpkg: error processing archive.

How To Solve dpkg : error processing when installing python3 pip3

1. Install python3 pip3 command

Error it produces of unmet dependencies

ubuntu 22 unmet dependencies when installing pip3

2. Command to fix the broken dependencies

Error of dpkg: error processing archive <filename>

ubuntu 22 error when try to solve unmet dependencies when install pip3

3. Force overwrite that caused the error processing

In my case its is my nodejs

The output after did the command

ubuntu 22 dpkg after force overwrite

4. Install again the pip

Now it is successfully installed.

ubuntu 22 successfully installed pip3 after force dpkg part 1
ubuntu 22 successfully installed pip3 after force dpkg part 2

5. Get your pip3 version

ubuntu 22 pip3 version

How To Install Nodejs v18 on Ubuntu 22

I installed Ubuntu 22 on my new PC. When I installed nodejs, the default version installed was v12. So I want to upgrade it to version 18.

I tried few methods but only using nvm it was successful.

Different Methods To Install NodeJS on Ubuntu 22

  1. Installing Nodejs with APT from default repositories- fail
  2. Installing Nodejs with APT using a NodeSource PPA – fail
  3. Installing Nodejs using Node Version Manager – success

Refer this tutorial from DigitalOcean

My Steps Installing Nodejs using Node Version Manager (nvm)

1) Firstly list the node version you want to install

ubuntu 22 - choose node version
ubuntu 22 – choose node version

2) Secondly, choose the version you want to install. I chose LTS v18 @ lts/hydrogen

ubuntu 22 - install node v 18
ubuntu 22 – install node v 18

3) Check if you have installed the right version.

ubuntu 22 - successfully installed node v18
ubuntu 22 – successfully installed node v18

If You Got Checksum Error

At first, I had the checksum error, when I checked on the internet it was due to curl installed using SNAP (which I did). I have to re-install my curl using APT and remove the snap path from the path environment.

ubuntu 22 - install node v 18
ubuntu 22 – install node v 18

Curl still point to snap/bin.

ubuntu 22 - curl still point to snap
ubuntu 22 – curl still point to snap

ubuntu 22 - installing node problem due to curl installed by snap
ubuntu 22 – installing node problem due to curl installed by snap

Remove the snap/bin from the environment. Edit it using nano

ubuntu 22 - edit the path at environment
ubuntu 22 – edit the path at environment

Ubuntu 22.04 Apache – 403 Forbidden You don’t have permission to access this resource

I tried to access my internal website using http://localhost but I got error of:

I am able to access the website via 127.0.0.1

I have checked my files access and all is good.

Solution

ubuntu 22 apache2 localhost able to access now

1. Edit your default.conf add localhost as ServerAlias (sudo nano /etc/apache2/sites-enabled/default.conf)

2. Edit your hosts as below (sudo nano /etc/hosts/)

3. Restart Your Apache2 server


MySQL Upload / Import Database via Command Line using Ubuntu 22

I imported / uploaded SQL database with file size of 210MB and 347MB via Ubuntu v22 terminal command line.

My MySQL version is: 8.0.32

mysql sql file size of 210mb
mysql sql file size of 347mb

The Command Line

How Long it took to Import The Data?

Below is the time it took to upload the data.

210MB: 20s
347MB: 1m30s


Nodejs Regex Concatenate String

I want to concatenate two strings to make a regular expression so I can have different prefix but same pattern at the back of the string.

If notice, must use double  back slashes if the regular expression uses back slash. Example instead of \d must use \\d.

Code

Output

nodejs regex concatenate strings demo output

Demo

You can test the Regex Concatenate Strings here.

hCaptcha Demo using PHP

hCaptcha is alternative to popular Google reCaptcha. It is used to avoid any form from being spammed by bots.

Why I use hCaptcha?

According to hCaptcha website owner can earn income by using their captcha technology. For the moment, I haven’t earned anything yet from hCaptcha.

earn income using hCaptcha

Demo hCaptcha Using PHP

Demo hCaptcha

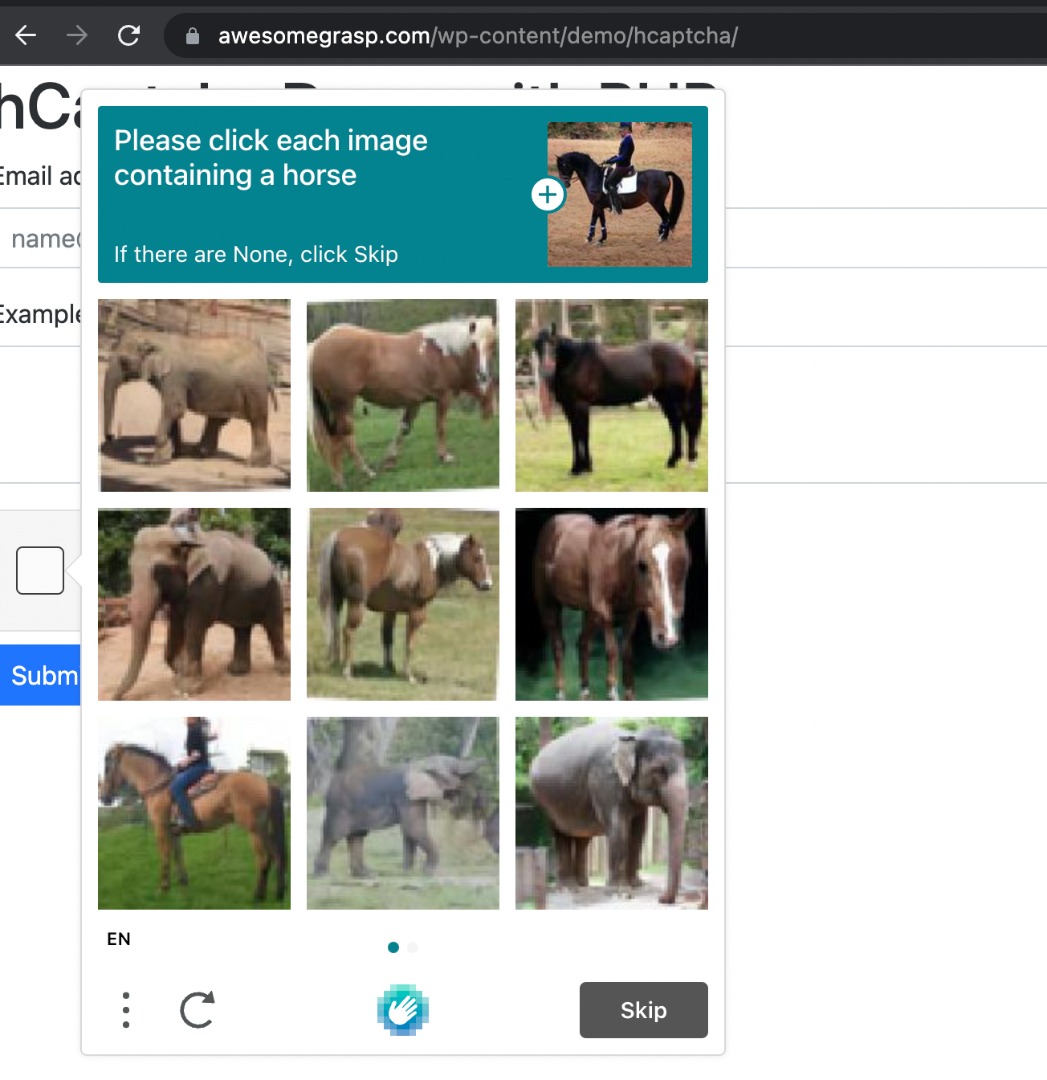
For this demo, you just submit the form by clicking “Submit form”. If you do the the hCaptcha correctly you will get hCaptcha success if not hCaptcha fail.

hcaptcha demo submit success
hcaptcha submit fail

How to Use hCaptcha Using PHP?

There are 3 Important steps:

  1. Add the hCaptcha widget to your webpage
  2. Verify the user response on server side
  3. Check the hCaptcha is ticked or no

Add the hCaptcha widget to your webpage

Add the script at HTML head

Add the hCaptcha widget to your form

Verify the user response on server side

According to hCaptcha documentation, to use POST method to query their endpoint.

Example of Success Response

If you print_r($json_data) will get the response below:

You can do your programming logic based on the success status.

Check the hCaptcha is ticked or no

There 2 methods to do this

  1. Check the post value of ‘h-captcha-response’
  2. Use data-callback

Method #1: Check the post value of ‘h-captcha-response’

The problem with the form as it is, if a user doesn’t do the hCaptcha test, the user still can submit the form. So we need to add javascript checking on the client side to check whether the user has done the captcha test or no.

If you have done the captcha test, hCaptcha will send a string of response in the $_POST[‘h-captcha-response’]. If not this string will be empty.

hcaptcha not done alert


The Full Code for Method #1


Method #2 – Use data-callback

Demo #2 Use Data Callback

hCaptcha has a call back option for when the checkbox is checked.

Disable the submit button

Then create a callback function:

The Full Code for Method #2


Boostrap 5 Validation Not Working

My Boostrap 5 Validation is not working. Even though I did what is said in the Boostrap 5 validation documentation.

Bootstrap 5 Validation Demo

Actually you need to include the javascript code below the form.


CSS Text Align Center Horizontally with Top Margin

I want to center the text horizontally with top margin I tried few options example text-align: center; but it doesn’t work.

So below is the solution:

The CSS to Align Center the Text

The HTML Code

The Output of Text Align Center with Top Margin

css text align center horizontally with top margin - 8 characters
css text align center horizontally with top margin – 8 characters
css text align center horizontally with top margin - 14 characters
css text align center horizontally with top margin – 14 characters
css text align center horizontally with top margin - 15 characters
css text align center horizontally with top margin – 15 characters

WordPress How To Switch Theme Dynamically by URL

I want to switch my WordPress theme dynamically where if my visitor visits a specific URL they will see different theme while my main theme is still the same for other URLs.

All Other Pages will Show Main Theme Like Below

wordpress switch theme dynamically - original theme
wordpress switch theme dynamically – original theme


Only for Page wordpress-how-to-switch-theme-dynamically-by-url/ will show below Theme

wordpress switch theme dynamically - different theme based on url
wordpress switch theme dynamically – different theme based on url


WordPress Hook to Change the Theme

You can do it by using pre_option_{$option} hook. In this case:

This hook will filter the value of an existing option before it is retrieved.

You can refer the pre_option hook here.

The Code to Change WordPress Theme Dynamically

Don’t Put The Code at Your Theme files

It doesn’t work if you put the code at functions.php or in any files under your theme folder.

You must put at a plugin.

Side Effect by Switching WordPress Theme Dynamically

By switching the theme dynamically, I noticed that:-

  1.  The my top main menu doesn’t appear. I don’t how to solve this yet.
  2. Google AdSense also seems not loaded
wordpress switch theme dynamically - top menu not appear
wordpress switch theme dynamically – top menu not appear